


HỘI ĐỒNG HƯƠNG BÀ-RỊA PHƯỚC-TUY - Clean boot in Windows
How to perform a clean boot in Windows
A clean boot is performed to start Windows by using a minimal set of drivers and startup programs. This helps eliminate software conflicts that occur when you install a program or an update or when you run a program in Windows 10, Windows 8.1, Windows 8, Windows 7, or Windows Vista. You may also troubleshoot or determine what conflict is causing the problem by performing a clean boot.
Why software conflicts occur?
When you start Windows by using a normal startup operation, several applications and services start automatically, and then run in the background. These programs include basic system processes, antivirus software, system utility applications, and other software that has been previously installed. These applications and services can cause software conflicts.
Notes: You must log on to the computer as an administrator to be able to perform a clean boot.
• Your computer may temporarily lose some functionality when you perform a clean boot. When you start the computer normally, the functionality returns. However, you may receive the original error message, or experience the original behavior if the problem still exists.
• If the computer is connected to a network, network policy settings may prevent you from following these steps. We strongly recommend that you do not use the System Configuration utility to change the advanced boot options on the computer unless a Microsoft support engineer directs you to do this. Doing this may make the computer unusable.
Use the following steps to perform a clean boot:
 Windows 10
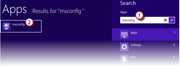
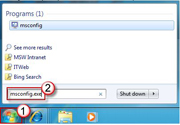
1. From Start, search for msconfig.
2. Select System Configuration from the search results.
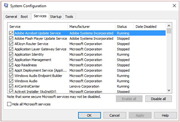
3. On the Services tab of the System Configuration dialog box, tap or click to select the Hide all Microsoft services check box, and then tap or click Disable all.
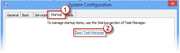
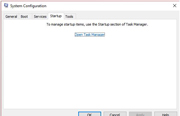 4. On the Startup tab of the System Configuration
dialog box, tap or click Open Task Manager
4. On the Startup tab of the System Configuration
dialog box, tap or click Open Task Manager
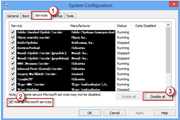
5. On the Status tab in Task Manager, for each startup item, select the item and then click Disable.
6. Close Task Manager.
7.On the Startup tab of the System Configuration dialog box, tap or click OK, and then restart the computer.
Windows 8.1 and Windows 8
 1. Swipe in from the right edge of the screen, and
then tap Search. Or, if you are using a mouse, point to
the lower-right corner of the screen, and then click
Search.
1. Swipe in from the right edge of the screen, and
then tap Search. Or, if you are using a mouse, point to
the lower-right corner of the screen, and then click
Search.
2.Type msconfig in the search box, and then tap or click msconfig.
 3. On the Services tab of the System Configuration
dialog box, tap or click to select the Hide all
Microsoft services check box, and then tap or click
Disable all.
3. On the Services tab of the System Configuration
dialog box, tap or click to select the Hide all
Microsoft services check box, and then tap or click
Disable all.
4. On the Startup tab of the System Configuration dialog box, tap or click Open Task Manager
5. On the Startup tab in Task Manager, for each startup item, select the item and then click Disable. A screenshot for this step.
 6. Close Task Manager.
7.On the Startup tab of the System Configuration dialog box, tap or click OK, and then restart the computer.
Windows 7 and Windows Vista
 1. Log on to the computer by using an account that
has administrator rights.
1. Log on to the computer by using an account that
has administrator rights.
2. Click Start, type msconfig.exe in the Start Search box, and then press Enter to start the System Configuration utility.
Note: If you are prompted for an administrator password or for confirmation, you should type the password or provide confirmation.
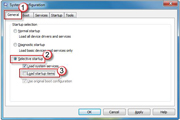
3. On the General tab, click the Selective startup option, and then click to clear the Load startup items check box. (The Use Original Boot.ini check box is unavailable.)
 4. On the Services tab, click to select the Hide all
Microsoft services check box, and then click Disable
all.
4. On the Services tab, click to select the Hide all
Microsoft services check box, and then click Disable
all.
Note This step lets Microsoft services continue to run. These services include Networking, Plug and Play, Event Logging, Error Reporting, and other services. If you disable these services, you may permanently delete all restore points. Do not do this if you want to use the System Restore utility together with existing restore points.
5.Click OK, and then click Restart.
What is next when I have a clean boot environment?
After the computer is restarted, you will have a clean boot environment. Then, do one of the following, as appropriate for your situation:
• If you could not install or uninstall a program or an update before you performed the clean boot, try to install or uninstall the program or update again.
Note: If you receive the "The Windows Installer service could not be accessed" error during the installation or uninstallation, follow How to start the Windows Installer service when system services are not loaded, and then install or uninstall the program or update again.•If the installation or uninstallation is successful, you have resolved your issue. Follow How to reset the computer to start as usual to reset your computer to the normal startup.
• If the installation or uninstallation still fails, that means this issue is not caused by application or service interference. You may have to go to Microsoft Support for more specific support.
• If you could not run a program before you performed the clean boot, try to run the program again.•If the program runs correctly, this issue is caused by application or service interferences. Follow How to determine what is causing the issue by performing a clean boot to determine which application or service causes the issue.
• If the program still does not run as expected, this issue is not caused by application or service interference. You may have to go to Microsoft Support for more specific support.
How to reset the computer to start normally after clean boot troubleshooting
After you have finished troubleshooting, follow these steps to reset the computer to start normally.
Windows 10, Windows 8.1, and Windows 8
1. From Start, search for msconfig. (In Windows 10, use the Search box from the Start menu. In Windows 8 or 8.1, wipe in from the right edge of the screen, and then tap Search. Or, if you are using a mouse, point to the lower-right corner of the screen, and then click Search.)
2. Select msconfig or System Configuration from the search results.
3. On the General tab, tap or click the Normal Startup option.
4. Tap or click the Services tab, clear the check box beside Hide all Microsoft services, and then tap or click Enable all.
5. Tap or click the Startup tab, and then tap or click Open Task Manager.
6. In task manager, enable all of your startup programs, and then tap or click OK.
7. When you are prompted to restart the computer, tap or click Restart.
Windows 7 and Windows Vista
1. Click Start, type msconfig.exe in the Start Search box, and then press Enter.
Note If you are prompted for an administrator password or for confirmation, you should type the password or click Continue.
2. On the General tab, click the Normal Startup option, and then click OK.
3. When you are prompted to restart the computer, click Restart.
How to determine what is causing the problem by performing a clean boot
Windows 10, Windows 8.1, and Windows 8
1. Log on to the computer by using an account that has administrator rights.
2. From Start, search for msconfig. (In Windows 10, use the Search box from the Start menu. In Windows 8 or 8.1, swipe in from the right edge of the screen, and then tap Search. Or, if you are using a mouse, point to the lower-right corner of the screen, and then click Search.)
3. Select msconfig or System Configuration from the search results.
4. Tap or click the Services tab, and then tap or click to select the Hide all Microsoft services check box.
5. Tap or click to select the upper half of the check boxes in the Service list.
6. Tap or click OK, and then tap or click Restart.
7. After the computer finishes restarting, determine whether the problem still occurs.•If the problem still occurs, repeat steps 1 through 6, but clear the lower half of the check boxes in the Service list that you originally selected.
• If the problem does not occur, repeat steps 1 through 6, and select only the upper half of the remaining check boxes that are cleared in the Service list. Repeat these steps until you have selected all the check boxes.
• If you still experience the problem when only one service is selected in the Service list, this means that the selected service causes the problem, and you should go to step 11. If no service causes the problem, go to step 8.
8. Repeat steps 1 and 3 in this section.
9. Tap or click the Startup tab, and then tap or click to select the upper half of the check boxes in the Startup Item list.
10. Click OK, and then click Restart. •If the problem still occurs, repeat steps 8 and 9, but clear the lower half of the checked boxes in the Startup Item list that you originally selected.
• If the problem does not occur, repeat steps 8 and 9, and select only the upper half of the remaining check boxes that are cleared in the Startup Item list. Repeat these steps until you have selected all the check boxes.
• If you still experience the problem after only one Startup Item is selected in the Startup Item list, this means that the selected Startup Item causes the problem, and you should go to step 11. If no Startup Item causes this problem, a Microsoft service probably causes the problem. To determine which Microsoft service may be causing the problem, repeat steps 1 through 7 without selecting the Hide all Microsoft services check box in each step.
11. After you determine the startup item or the service that causes the problem, contact the program manufacturer to determine whether the problem can be resolved. Or, run the System Configuration utility, and then tap or click to clear the check box for the problem item.
Windows 7 and Windows Vista
1. Log on to the computer by using an account that has administrator rights.
2. Click Start, type msconfig.exe in the Start Search box, and then press Enter to start the System Configuration utility.
Note: If you are prompted for an administrator password or for confirmation, you should type the password or provide confirmation.
3. Click the Services tab, and then click to select the Hide all Microsoft services check box.
4.Click to select the upper half of the check boxes in the Service list.
5.Click OK, and then click Restart.
6.After the computer finishes restarting, determine whether the problem still occurs.•If the problem still occurs, repeat steps 1 through 5, but clear the lower half of the checked boxes in the Service list that you originally selected.
• If the problem does not occur, repeat steps 1 through 5, and select only the upper half of the remaining check boxes that are cleared in the Service list. Repeat these steps until you have selected all the check boxes.
• If you still experience the problem after only one service is selected in the Service list, this means that the selected service causes the problem. Go to step 10. If no service causes this problem, go to step 7.
7. Perform a clean boot by repeating steps 1 and 2.
8. Click the Startup tab, and then click to select the upper half of the check boxes in the Startup Item list. A screenshot for this step.
9. Click OK, and then click Restart.
• If the problem still occurs, repeat steps 7 and 8, but clear the lower half of the checked boxes in the Startup Item list that you originally selected.
• If the problem does not occur, repeat steps 7 and 8, and select only the upper half of the remaining check boxes that are cleared in the Startup Item list. Repeat these steps until you have selected all the check boxes.
• If you still experience the problem after only one Startup Item is selected in the Startup Item list, this means that the selected Startup Item causes the problem. Go to Step 10. If no Startup Item causes this problem, a Microsoft service probably causes the problem. To determine which Microsoft service may be causing the problem, repeat steps 1 through 6 without selecting the Hide all Microsoft services check box in either step.
10. After you determine the startup item or the service that causes the problem, contact the program manufacturer to determine whether the problem can be resolved. Or, run the System Configuration utility, and then click to clear the check box for the problem item.
How to start the Windows Installer service when system services are not loaded
If you run a Setup program without starting the Windows Installer service, you may receive the following error message:
The Windows Installer service could not be accessed. Contact your support personnel to verify that the windows Installer service is properly registered.
The Windows Installer service does not start if you clear the Load system services check box in the System Configuration utility. To use the Windows Installer service when system services are not loaded, you must start the service manually. To do this, follow these steps.
Windows 10, Windows 8.1, and Windows 8
1. From Start, search for computer. (In Windows 10, use the Search box from the Start menu. In Windows 8 or 8.1, swipe in from the right edge of the screen, and then tap Search. Or, if you are using a mouse, point to the lower-right corner of the screen, and then click Search.)
2. Right-click or swipe down on Computer in the search results, and then tap or click Manage.
3. In the console tree, tap or click Services and Applications, and then tap or click Services.
4. In the details pane, right-click or swipe down on Windows Installer, and then tap or click Start.
Windows 7 and Windows Vista
1. Click Start, right-click Computer, and then click Manage.
Note If you are prompted for an administrator password or for confirmation, type the password or provide confirmation.
2. In the console tree, click Services and Applications, and then click Services.
3. In the details pane, right-click Windows Installer, and then click Start.